Saturday, November 22, 2014

How to Get a Great Twist Out on Transitioning or Natural Hair

Ismail oubarka | 2:30 AM
by napturallycurly

Achieving a great twist out takes a bit of practice, but there are some steps people often omit that can ruin the style. I’m going to show you how to get great results every time!


Wait. Hold Up Transitioners!

The twist out directions are below, but transitioners pay attention and learn what not to do!

When I was transitioning, I didn’t have much luck with my first two strand twist out because my ends were very thin and damaged.
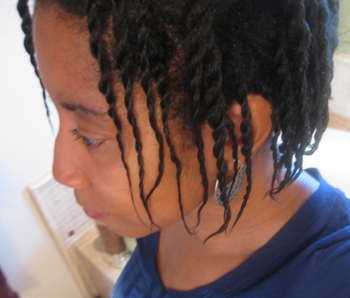
First, take a look at my twists (3 months into transition)…
two strand twists
Yikes!  What a train wreck!

Notice how damaged and thin my ends are, especially near the front.  I had at least 3-4 inches that really needed to be cut off, but I was trying to hold on to as much hair as I could since I had already cut more than I wanted to.
Now see the results of the twist out…
Twist Out on Transitioning Hair
This would have looked much better had I trimmed more of my hair first.

I put rollers on the ends to give them a slight bump because the straight look was NOT HOT:)  That helped a little, but the ends really ruined the style.
I didn’t try the twist out again until a few months later.  I also used small perm rods on the ends the 2nd time so they would have a tighter curl.  Here are the results…
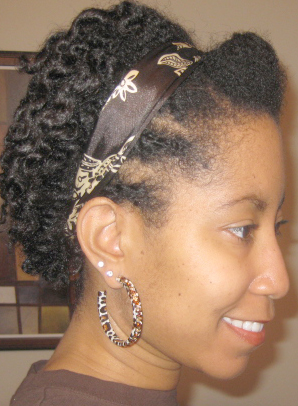
Twist Out
Notice that my hair looks a lot healthier because those scraggly ends are gone.  I also had a few more inches of natural hair here, which makes for a fuller look.

Here’s a video showing how I achieved this look…


How to Do a Twist Out on Transitioning or Natural Hair

1. Make sure your ends are trimmed and you’ve gotten rid of any that are overly thin and damaged.
2. Shampoo and condition your hair as normal.
3. While your hair is wet and detangled, grab a section of hair to twist.  Apply your favorite twisting product.
If you want a more stretched, longer twist out, let your hair dry in twists or some kind of stretched style and twist on dry hair.
Also, if you’re on a budget, learn how to make flaxseed gel.  It’s cheap, natural and goes a long way!  (Feel free to add a natural oil underneath any gel-based product to keep your hair from getting too hard.)
You can also try a setting lotion instead of a twisting creme or gel.  I like BB’s setting lotion because it doesn’t have have alcohol, which can dry out your hair.
4. Twist your hair taught all the way to the end and transitioners should use a perm rod on the end to keep them from hanging straight and unraveling.
5. Allow hair to dry fully.  If you take your twists down while wet or damp, you’ll get frizz.
6. Remove the rods (if applicable).
7. Coat your fingers with a natural oil (castor, olive etc.) to prevent frizz and remove the twists by gently twisting/rotating the entire twist in the opposite direction.
8. Once you begin rotating, gently slide your finger between the twisted hairs and the twists should come apart easily.
NOTE: Don’t try to pry the twists apart without rotating them in the opposite direction first or you may frizz the hair.
Enjoy your twist out!

Nighttime Routine

You may need to re-twist your hair at night depending on how defined you want your style to be for days to come.
Apply a small amount of your twisting product and re-twist. Just be careful of re-applying too much product because you don’t want build up.
Sleep in a satin bonnet to preserve your style.
If you don’t want to re-twist and your hair is longer, you can “pineapple the hair” by making a loose, high puff on top of your head with a Goody band. Then wrap the sides of your hair with a satin scarf.

One of My Favorite Twist Outs With Two-Strand and Flat Twists


Saturday, November 15, 2014

8 Fun Protective Styles for Natural Hair This Winter

Ismail oubarka | 2:56 AM
 

This winter, whether you’re twisting it up or going semi-straight, here are some fun protective styles for you:

8 Fun Protective Styles for Natural Hair This Winter
1-3. Three Faux Classic Updos
Nyla starts from heatless stretched hair, which you can achieve by watching her other tutorial here.  Other options are to start from hair that has been blow dried or roller set. All the styles in this tutorial are effortless.


Description: Three classic updos (two of which are braided) with Marley Hair.
Products used: Water
Tools: Marley Braid Hair, comb, bobby pins, hair tie
4. Twist Updo with Side Swoop
Even if you are not the best at flat twisting (Naturally Michy admits to not being), you can still create this look. Only one side is flat twisted while the rest is twisted.

Description: Twists are rolled and pinned into an updo with a side swoop.
Products used: Shea Moisture Curl Enhancing Smoothie, Eco Styler Olive Oil Gel
Tools: Clips, rattail comb (for parting), bobby pins

5. Mini Braids/Twists Into Bun
This protective style is great for those with thin (or scalpy) braids/twists. The entire video is really informative, but if you want to head straight to the tutorial, fast forward to 7:09.


Description: Mini twists with faux bun using Marley Hair
Products used: Shea Moisture Curl Enhancing Smoothie, Eco Styler Olive Oil Gel
Tools: Marley Hair, hair tie
6. Twisted Halo Crown Updo
If you are not sick of halo braids yet, check out this cute twisted crown on Melodie. The great thing about this style is that it is super easy and chic.


Description: Twisted halo crown updo with side part.
Products used: Water, moisturizer

7. Easy Flat Twist Updo
Here is another twist updo by Naturally Michy. She creates flat twists on both sides with regular twists going down the middle and back.


Description: Twists with side flat twists are pinned into a mohawk-type updo.
Products used: Shea Moisture Curl Enhancing Smoothie, Eco Styler Olive Oil Gel
Tools: Clips, rattail comb (for parting), bobby pins

8. Jumbo Flat Twist Updo
For this look on WestNDNbeauty, start on previously blow-dried or stretched hair.  If you are not a fan of small flat twists, these big ones are a great alternative.


Description: Three classic updos with Marley Hair.
Products used: Shea Moisture Manuka Honey & Mafura Oil Intensive Hydration
Tools: Comb, bobby pins

What protective style(s) are you wearing this winter?

Saturday, November 1, 2014

Zoe Saldana Weave Hairstyle: Mid-length layers

Ismail oubarka | 4:57 AM
Zoe Saldana Weave Hairstyle: Mid-length layers

Zoe Saldana Weave Hairstyle


American actress Zoe Saldana looks gorgeous with her mid-length mocha brown layers of hair and a light berry-hued lipstick. 

Layers are flattering for every face shape, and they give then/fine hair extra volume and body. Make sure that your shortest layer is below chin level for a sleek and stylish outline. 

If you have a long face shape, layers can add width if you concentrate them at cheek level. Avoid shorter layers as they can make round faces look even rounder.


Jourdan Dunn Weave Hairstyle: Long, glossy locks

Ismail oubarka | 4:48 AM
Jourdan Dunn Weave Hairstyle: Long, glossy locks


Jourdan Dunn Weave Hairstyle


British fashion model Jourdan Dunn looks divine with her long, glossy locks cascading over one shoulder. If you’re struggling to grow your natural hair out and you can’t wait to tie your hair up in a thick ponytail, why not get a long, glamorous weave to speed up the process? 


Source a high quality human hair weave for best results, and only keep it in for 2-3 months – any longer and you risk hair breakage and unsightly bald patches! Moisturize your scalp daily for healthy hair – natural oils, like olive, coconut, and jojoba will keep your scalp in tip-top condition


hair ideas © 2013. All Rights Reserved | Powered by-Blogger

Designed by-Windroidclub