Achieving a great twist out takes a bit of practice, but there are some steps people often omit that can ruin the style. I’m going to show you how to get great results every time!
Wait. Hold Up Transitioners!
The twist out directions are below, but transitioners pay attention and learn what not to do!
When I was transitioning, I didn’t have much luck with my first two strand twist out because my ends were very thin and damaged.
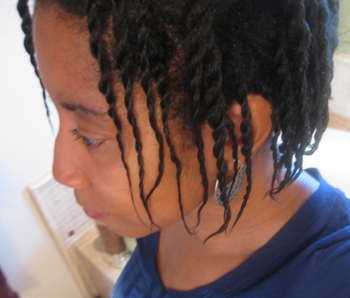
First, take a look at my twists (3 months into transition)…
Yikes! What a train wreck!
Notice how damaged and thin my ends are, especially near the front. I had at least 3-4 inches that really needed to be cut off, but I was trying to hold on to as much hair as I could since I had already cut more than I wanted to.
Now see the results of the twist out…
This would have looked much better had I trimmed more of my hair first.
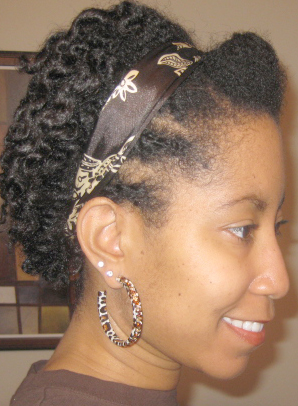
I didn’t try the twist out again until a few months later. I also used small perm rods on the ends the 2nd time so they would have a tighter curl. Here are the results…
Notice that my hair looks a lot healthier because those scraggly ends are gone. I also had a few more inches of natural hair here, which makes for a fuller look.
Here’s a video showing how I achieved this look…
How to Do a Twist Out on Transitioning or Natural Hair
1. Make sure your ends are trimmed and you’ve gotten rid of any that are overly thin and damaged.
2. Shampoo and condition your hair as normal.
3. While your hair is wet and detangled, grab a section of hair to twist. Apply your favorite twisting product.
If you want a more stretched, longer twist out, let your hair dry in twists or some kind of stretched style and twist on dry hair.
Also, if you’re on a budget, learn how to make flaxseed gel. It’s cheap, natural and goes a long way! (Feel free to add a natural oil underneath any gel-based product to keep your hair from getting too hard.)
You can also try a setting lotion instead of a twisting creme or gel. I like BB’s setting lotion because it doesn’t have have alcohol, which can dry out your hair.
4. Twist your hair taught all the way to the end and transitioners should use a perm rod on the end to keep them from hanging straight and unraveling.
5. Allow hair to dry fully. If you take your twists down while wet or damp, you’ll get frizz.
6. Remove the rods (if applicable).
7. Coat your fingers with a natural oil (castor, olive etc.) to prevent frizz and remove the twists by gently twisting/rotating the entire twist in the opposite direction.
8. Once you begin rotating, gently slide your finger between the twisted hairs and the twists should come apart easily.
NOTE: Don’t try to pry the twists apart without rotating them in the opposite direction first or you may frizz the hair.
Enjoy your twist out!
Nighttime Routine
You may need to re-twist your hair at night depending on how defined you want your style to be for days to come.
Apply a small amount of your twisting product and re-twist. Just be careful of re-applying too much product because you don’t want build up.
Sleep in a satin bonnet to preserve your style.
If you don’t want to re-twist and your hair is longer, you can “pineapple the hair” by making a loose, high puff on top of your head with a Goody band. Then wrap the sides of your hair with a satin scarf.


No comments:
Post a Comment